
How to Shingle a Roof
Every roofer does things a little differently, but most agree that the key to installing shingles is mapping out the pattern before starting. Each shingle should be secured with 4-6 roofing nails, although six may be preferred for areas that experience high winds.
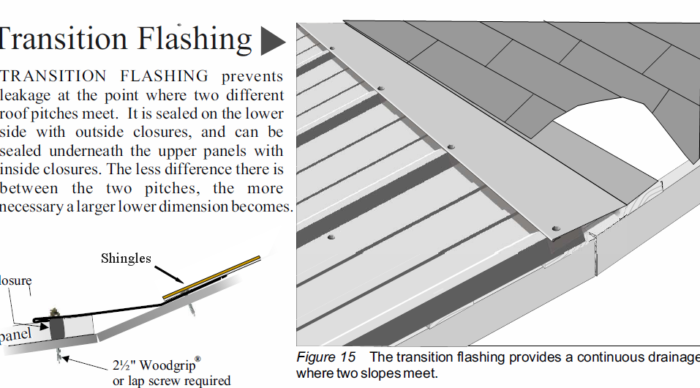
Installing valley flashing directs water safely away from the area where two roof parts with different pitches or angles meet. Dubbing (clipping the corner of a shingle) helps keep water flowing downhill along a cut edge. Visit www.owassoroofer.com for your free roof inspection today!
Layout the Felt
As with any Owasso roofing project, the preparation is key. You want to make sure the roof is free of any sharp objects and the existing felt is in good condition. You also want to make sure the weather is nice and not rainy before you start working. Once you have prepped the roof, it is time to lay the underlayment. Felt is a bituminous material that can be used as an underlayment for your shed, garage, or flat roof. It is a durable, water-resistant material that can keep your roof from leaks. To install felt, begin by measuring the area of your roof to determine its size. This will give you a clear idea of how much felt to purchase and what shape the felt needs to be.
After allowing the required amount of time for the adhesive to set, roll out your first strip of felt. Start at the lowest edge of the roof and ensure the selvedge (the side of the felt which is mineral free) is away from the roof edge. Brush away any loose mineral chips and overlap the next strip of felt. Repeat this process until you reach the ridge of your roof. When you get to the ridge, be sure to leave a minimum of 15cm overlap on each sheet and secure them with clout nails at 5cm intervals.
Once you are satisfied that the new underlayment is properly secured, it is time to apply the bonded top layer of felt. As with the underlayment, this should be applied in strips, moving up the roof to the ridge. It is important that the new felt be laid and fixed in a manner that leaves it flat and not sagging.
At this point you should also be ready to work on any additional edge details such as dressing up a verge with triangular fillets or forming a verge detail where the felt drains into a gutter.
While laying felt isn't a complicated process, it is one that should only be undertaken by competent DIYers. It is a labor intensive and costly project and you will want to be sure you are prepared before tackling this job.
Lay Out the Shingles
A new roof can significantly increase your home’s value and add to its curb appeal. However, not many homeowners have the time or experience to install a new roof on their own. For this reason, most hire professional roofers for their roofing needs. However, learning the basic steps of how to shingle a roof can make your project go much more smoothly. This article will teach you the basics of shingle installation and offer some tips to help you get started.
When laying the shingles, it’s important to start with the proper underlayment layer. This layer sits between the shingles and the roof deck to help prevent water leaks and other problems. After the underlayment has been laid, you’ll begin installing the shingles in courses (rows) across the roof. It’s recommended to use a nailer to make this process faster and easier.
Before you begin installing the shingles, snap a line of chalk along the edge of the roof to mark the starting point for the first row. Overlap each shingle by about an inch, and then nail them in place using your roofing nails. You may want to consider adding more nails per shingle to increase the strength of your roof in high winds.
Once you’ve completed the first row of shingles, begin installing the second course of shingles. Repeat the same process as with the first course, but ensure that each shingle overlaps by about an inch. Continue to install the shingles in this manner until you reach the ridge. Once you’ve installed all of the field shingles, you can begin installing the hip and ridge cap shingles.
The shingle manufacturer will typically provide detailed guidelines for how to install these specialized shingles. However, they will generally require that the shingles be nailed in a specific pattern to achieve proper installation.
When installing the shingles, it’s also important to clip or dub the corners of each shingle. This is done to keep water flowing downhill and away from the roof rather than through the open corner. Additionally, this step helps to ensure that the shingle edges are fully sealed.
Nail the Shingles
Putting a new roof on a home is an excellent way to increase the value and curb appeal of your property. Many people choose to shingle their roofs themselves, but the process can be challenging if you are not familiar with the proper roofing materials and techniques. Learning how to shingle a roof can save you money and give you an added sense of accomplishment in your home improvement project. Before you begin the shingles installation, make sure to prepare your work area. Clear away any plants or obstacles that could become tripping hazards and cover them with sturdy tarps. You should also pull any yard games and furniture away from the exterior of your home to prevent them from being damaged by drops and debris during the shingle installation process.
The first step in the shingle installation process is to lay out the underlayment layer. The underlayment sits between the shingles and the roof deck and offers secondary protection from the elements. It should be installed overlapping to the end of the roof.
Once you have completed the underlayment layer, it is time to install the shingles. Begin the first course of shingles in the center of the roof, working left and right toward the ridges (depending on the manufacturer's recommendations). Use four roofing nails per shingle for maximum security.
After each shingle, make a chalk line to mark the next row. Ensure that the shingle overlaps the previous one by about one inch. Repeat the process for each row until you reach the ridge or hips of the roof. When you get to the ridge of a hip roof, leave about a tab width overhang to allow for future ridge vents.
The final steps in the shingle installation process are to nail down the ridge cap and cover any exposed nails with spots of roofing cement. Ridge caps provide a finished look to the roof and help to seal the shingle seams from moisture. When installing a ridge cap, ensure that it is secured over the last full shingle and that there is at least a 5-inch reveal.
Nail the Ridge Shingles
Shingles are a great way to increase the value and appearance of your home. But it's important to know how to shingle the roof correctly. If not done properly, the shingles could be damaged and cause leaks. It's also important to follow the proper nailing procedures and shingle installation instructions. Using the correct roofing nails is critical for protecting your investment and helping it stand up to strong winds.
Before starting the actual shingle installation, it is recommended that you snap a chalk line running horizontally up the roof to help ensure that each course is straight. This will make the job easier, especially when you come to installing the ridge cap shingles.
When the first ridge cap shingle is placed, it should be nailed to the roof sheathing. This should be done with a minimum of four roofing nails, although some manufacturers suggest using six for high-wind areas. Make sure that the nail heads are covered with roofing cement to hide them from view.
Next, install the rest of the ridge cap shingles. Make sure that they are nailed to the roof sheathing and over the nails that were used for the previous ridge cap shingle. Ensure that the nails are positioned evenly throughout the row, and that they are not too close together. It's best to use a nail gun for this task, since it will allow you to drive the nails into the sheathing more easily and quickly.
Before nailing each ridge cap shingle, remove the cellophane that covers the adhesive strips on each end and along both sides of the shingle. Apply a small dab of roofing cement to each spot to help protect and seal the area. Then, drive in one roofing nail with a plastic cap or washer into each of the two cutout slots on the shingle (including the half slot on each side).
When nailing the last ridge shingle, it's best to nail it so that its exposed end faces down-wind. This will prevent it from getting ripped off by wind-driven debris. Also, be sure to set the final hip and ridge cap shingles in mastic or sealant to improve their resistance to wind damage.
Looking for professional help in the Owasso or surrounding area? Reach out to Owasso Roofer today for all your roofing needs!
Every roofer does things a little differently, but most agree that the key to installing shingles is mapping out the pattern before starting. Each shingle should be secured with 4-6 roofing nails, although six may be preferred for areas that experience high winds. Installing valley flashing directs water safely away from the area where two…